"Coco"
Step by Step Oil
Pastel Painting
 |
|
Image 1:
ROUGH DRAFT
The
first stage is the initial blocking in of
shapes and laying down of basic colours,
textured only minimally.
During this beginning stage, I use only
the oil pastel sticks themselves, since
my intention is simply to map out future
colours and tones quickly & loosely.
|
Image 2:
INITIAL BLENDING
Next,
I use a rounded blending tool to smooth
together the existing oil pastel on the
paper. This is again a rough stage, meant
only to give me a sense of the general
shape, blended colour and shading of
Coco. It allows me to assess the overall
look and how the painting is evolving,
noting adjustments to colours, etc, where
needed.
|
|

|
His
eyes are developed further, adding depth
and highlights at this early stage in
order to give me a focal point.
|
 |
 |
|
Image 3:
SHADOWS & TEXTURE
At this point, I begin to layer further oil
pastel over the blended draft base,
particularly adding shadow to his chest
area. These are small amounts added a
little at a time then blended in as I go.
Colour alterations are made at this stage
by using a finger to gently smooth over
fine hatched lines of new oil pastel,
blending them into the painting beneath.
Using finer tools, texture is added to
the markings around his face, his ears
are defined, and shadows & highlights
are blended into his tail and legs.
|
Image 4:
BLENDING & DEPTH
I cover the under-shadows of his chest with
several overlays of white, smoothed
lightly with fingers after each
application. By gradually building thin
layers of white over the already blended
brown & grey beneath, the hair
becomes almost translucent, giving the
impression of depth & softness.

Further detailing and shading are blended in
throughout. Fine texturing is added where
colours & shadows end and meet. The
outer shape of his tail is formed.
|
|

|
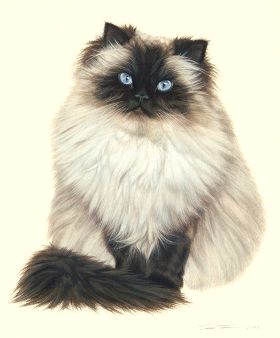 |
|
THE
FINISHED PORTRAIT
Final
detailing and soft blending of all areas
with fingers and fine tools. Tiny lines
are added in various spots to give the
effect of individual hairs. The edges of
Coco's body are softened, while whiskers
and individual touches are added to his
face & eyes.

|
Return to
the Oil Pastel Page


All images on this site © Artist Sarah
Theophilus 1991-2007, no reproductions permitted.
Please contact the Artist for licensing
information.
|


